
Are you exhausted while searching for a screen and audio recorder for Windows 10 that can help you complete your task with recording? Don’t worry! Here we bring you a list of built-in and third-party applications to make your work easier. It doesn’t matter if you are a working professional, a YouTuber, a gamer, or simply want to record your screen for tutorials; this article will help you in every way.
So, what are you waiting for? Let’s dive in to explore without delay!
Part 1: What is a Screen and Audio Recorder, and Why Is It Used?
A Screen and audio recorder is software that helps you record every activity happening on your computer, along with audio. If you are planning to record activities such as tutorials, presentations, video chats, and gaming sessions, then this software is best for you. It is used for various purposes, such as instructional videos, preserving digital evidence, or sharing experiences.
Moreover, it provides seamless communication, transfers knowledge, smooths remote collaboration, and works as a valuable tool for troubleshooting and content creation.
Hence, we can consider that with this recorder, you can save time and achieve captivating content for your audience.
Part 2: How to record screen on Windows 10 with audio: Using Xbox Game Bar
Xbox Game Bar is a built-in gaming overlay in Windows 10 and Windows 11 created by Microsoft. It allows you to easily screen capture with audio while playing the game. The only thing you need to do is just open the Xbox Game Bar while pressing the Windows logo key + G on the keyboard. Moreover, you don’t need to switch to a desktop to adjust the volume of the media player and other apps, as you can do it straight from your game.
Additionally, while playing games, you can observe the performance of your computer with the Xbox Game Bar. If your computer struggles to run your game, you can easily make adjustments to the game’s graphic quality to run it more frequently.
Here we are mentioning such simple steps to use the Xbox Game Bar for your convenience.
Step 1: Press the Windows logo key + G to open the Xbox Game Bar. Here is a box labeled Yes, this is a game that will appear. You just need to check the box.

Step 2: To begin the recording immediately, you can press the Windows logo key + Alt + R when you are playing a game in full-screen (or full-screen exclusive) mode.
- To take a still screenshot, you can use the Camera.
- To start recording your screen, use the Red Circle.
- To record your voice while capturing the screen, you need to check the Record Mic box.

The video file will be saved by default as an MP4 file (.mp4) within your user folder under Video > Capture.
Part 3: The 6 Must-Use Screen and Audio Recorders!
Here, we bring amazing screen and audio recorders so that the question “How to screen record on windows 10 with audio” will no longer exist. The only thing you need to do is stay connected with us.
1. Wondershare DemoCreator
If you are searching for a tool that can record screen and audio as well as provide editing features, Wondershare DemoCreator is the most recommended. It is considered the complete suite for recording and editing videos with advanced features in a matter of minutes. The only thing that is required is to explore Wondershare DemoCreator. We are discussing its features so that you can get familiar with them easily.

Key Features:
- Captures screen activity easily with high-quality video and audio.
- With this, you can trim, crop, and merge recordings.
- Provides the recording of webcam footage and can easily be added to your screen recordings.
- Comes with advanced filters so that you can enhance your video quality.
Pros:
- It has an intuitive and user-friendly interface.
- Compatible with Windows and Mac as well.
- Provides a watermark to your recording to prevent unauthorized use.
- You can export your files into formats including MP4, AVI, MOV, and more.
- Offers multiple editing tracks of video and audio simultaneously.
Cons:
- Limited features are available in the free trial.
Pricing:
- Offers free-trial.
- Provides Cross-Platform monthly plan for US$15/month.
- Offers Cross-Platform yearly plan for US$59.99/year.
- Perpetual plan costs US$79.99.
So, if you think about using it, we are sharing a step-by-step guide to make your work a little easier.
Step 1: Download Wondershare DemoCreator from its official website. Launch it on your device and open it. Here you will navigate to the “Home” page.

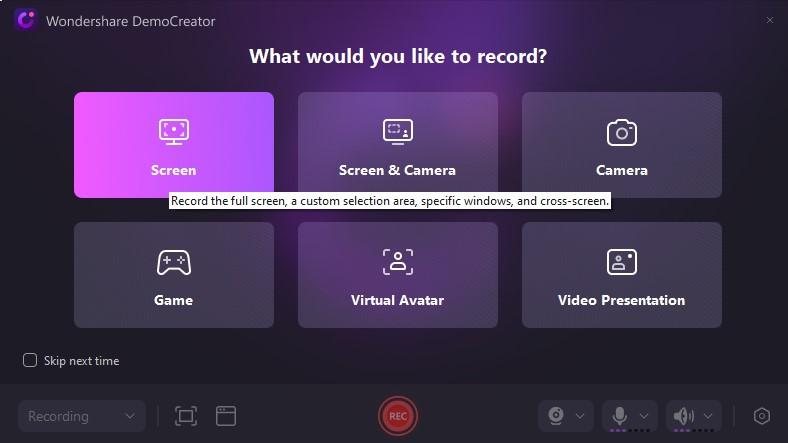
Step 2: Click on the video recorder, and then you will get six options for recording. Choose as per your needs.
Step 3: You can start recording while clicking on the “REC” button. Make sure the mic and webcam are detected so that you can record these as well.

Step 4: Once you finish your recording, click on the red button to stop recording.

After recording, you can easily edit videos according to your needs to enhance video content and export.
2. OBS Studio
OBS Studio is widely used for video recording and streaming screens and webcams simultaneously. It provides a high-performance recording of screen and audio in real-time.
Moreover, it is open-source and available for Windows, macOS, and Linux.

Key Features:
- Offers advanced audio features such as noise reduction, gain control, and more.
- Allows to create and manage multiple scenes.
- It is available for free.
Pros:
- Provide various filters, such as stickers, color correction, and other effects.
- Comes with a highly customizable interface.
- With its cross-platform support, it becomes a great option for those who work across multiple operating systems.
Cons:
- Provides limited customer support.
Pricing:
- It is free of charge with no limitations.
3. Screen-O-Matic
Screen-O-Matic is a screen and audio recorder that is simple to use. With this, you can record a screen, webcam, or both with just a few clicks. It is not only compatible with Windows but also with macOS and ChromeOS (in the browser). So, let’s discuss its features to learn more about it.

Key Features:
- Provides annotations, shapes, and highlights to the recorded screen for enhancing clarity.
- Ease in exporting videos on social media platforms such as Facebook, Vimeo, and YouTube.
- Provides cloud storage for easy sharing and access.
Pros:
- Offers recording in high-definition with crystal-clear audio.
- With its collaboration feature, it becomes easy to work as a team on video projects.
- Advanced editing features allow you to make a video like a professional.
Cons:
- Comes with a watermark on the videos.
- Limited features in the free version.
Pricing:
- The free version is available.
- The cost for Solo Deluxe is $3/month.
- Solo Premier comes with $6/month.
- Solo Max costs $10/month.
- Team Business costs $8/month.
4. Movavi
Movavi is a popular screen and audio recorder that allows you to create high-quality video. This is compatible with both Mac and Windows, so you don’t need to worry if you are working on Mac or Windows. As it provides a user-friendly it becomes easy to start recording. Let’s figure out its features and learn more about it.

Key Features:
- Easy to record audio from a computer, microphone, or external devices.
- You can customize recordings by adjusting settings like resolution, frame rate, and bitrate.
- Provides audio editing tools such as trimming, cutting, and merging audio files.
Pros:
- Create high-quality video and audio files with minimal compression.
- Quite affordable as compared to other software.
- The free version is available.
Cons:
- Provides limited features in the free version.
- Include a watermark in the free version.
Pricing:
- Availability of the free version.
- Video suite 1-year subscription costs $79.95.
- Video suite personal lifetime plan costs $99.95.
- Video suite business plan costs $199.95.
5. Camtasia
Camtasia is a screen and audio recorder for beginners as well as professionals. With its user-friendly interface, it becomes quite easy to create high-quality videos. Moreover, it is compatible with both the Windows and Mac operating systems. So we can say that it clarifies your doubt about “How to record screen and audio on windows 10.”

Key Features:
- Provides advanced features of video editing, including splitting, trimming, and merging clips.
- Can add music and sound effects and remove background noise.
- Easy to share projects with others and collaborate in real time.
Pros:
- Comes with a user-friendly interface.
- Produces high-quality videos that are quite suitable for professional use.
- Offers features like green screening, audio ducking, and chroma keying.
Cons:
- Availability of limited features in the free trial.
- Quite expensive compared to other recorders.
Pricing:
- Free-trial available.
- Individual subscriptions cost $179.88/year.
- Business plan costs $299.99.
- Education plan costs $1641.03.
- Government and non-profit plans cost $201.74.
6. Flashback Express
Flashback Express is another screen and audio recorder that helps you complete your task effortlessly. It offers the recording of a webcam at the same time as screen recording. Moreover, it provides a well-designed interface and is available for Windows. So, without wasting any time, let’s move towards its key features.

Key Features:
- Provides integration with various platforms like Shopify, WordPress, and more.
- Highly customizable to enhance video content.
- Supports video formats such as MP4, FLV, AVI, and more.
Pros:
- You can record and play video from any location, on any device.
- Provide secure storage and encryption to protect your video content.
Cons:
- Limited features in the free version.
Pricing:
- Availability of a free version.
- 1-PC license costs Euro 24.
- 2-PC license costs Euro 35.
- 3-PC license costs Euro 53.
Part 4: How to Choose the Best Screen and Audio Recorder?
While choosing the best screen and audio recorder as per your needs, you must consider a few factors:
• Screen Recorder: While choosing the screen recorder, consider screen resolution, bitrate, and framerate. If you are looking for high-quality recording, then find software that can handle high definition and 4K resolution.
• Audio Recording: You need to know first which type of audio recording you require, such as whether you need to capture system audio, microphone audio, or both. Then, accordingly, choose the audio recorder.
• Editing Capabilities: Consider what type of editing tools you need. They can have advanced editing features such as chroma keying, color collection, or multi-track audio editing. It completely depends on you.
• Compatibility and Pricing: Don’t forget about the compatibility (with Windows and Mac) and the pricing of the software you are looking to use to record screen and audio.
It should be user-friendly. Still, if you have any queries while choosing the best one, don’t forget to read reviews and ratings.
Conclusion
So, we have discussed in-depth screen and audio recorder tools so that you can easily choose what suits you best. We made it easy by sharing their key features, pros and cons, and even pricing. Hope, it is beneficial for you. But still, if you are looking for a tool that can do everything in a matter of minutes, then you must try Wondreshare DemoCreator.
FAQs
Yes, with Wondershare DemoCreator, you can easily record your screen with audio for any purpose.
Yes, some screen and audio recorders offer cloud-based solutions so that you can access your recording from multiple devices.
Wondershare DemoCreator is software that provides the features of audio recording editing.